From v3.0.0 of the CMS, Interactive Actions can be used to effect changes to a Layout. Actions can be attached to an entire Layout, specific Regions or Widgets and can be triggered by Touch/Click or programmatically by webhooks.
This guide will go through the desired workflow to attach a webhook action to an entire Layout that will then trigger the navigation to another Layout and details the ways web hooks can be sent when developing and testing:
Add Layouts
Firstly we need to add 2 Layouts;
1 - One to include the webhook action - we shall call Layout A
2 - And a Layout to navigate to when triggered - we shall call Layout B
So that a webhook action can be correctly set, start by adding the Layout to navigate to (Layout B):
Add/Create Layout B
-
Navigate to Layouts from the Design section of the main menu and click Add Layout.
-
Complete the form and include a Code Identifier which will be used to identify this Layout when configuring the Action.
For this example, I have entered
Bas the Code Identifier.
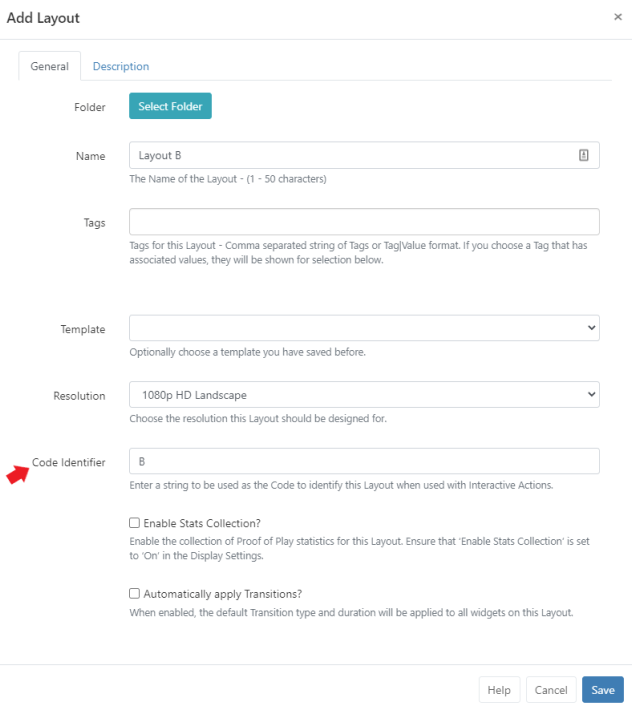
- Click to Save
- Use the Layout Designer to create your Layout and once happy with the design, set to Publish.
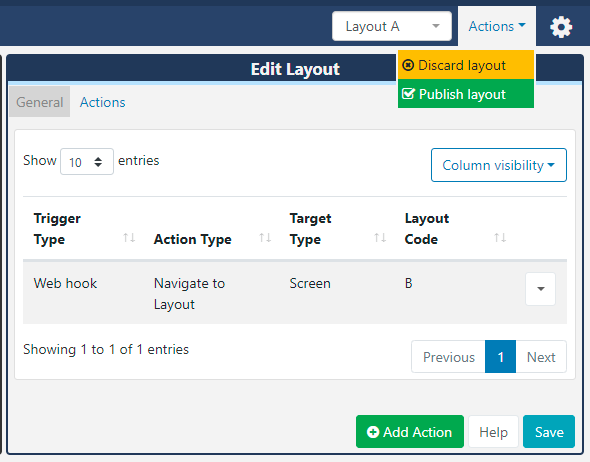
Next create a Layout to contain the webhook Action (Layout A):
Add/Create Layout A
- Navigate to Layouts from the Design section of the main menu and click Add Layout.
- Complete the form and Save.
- Click on the Actions tab from the Edit Layout form and select the Add Action button.

A form will open so that we can configure the action for this Layout:

-
Select Web hook as the Trigger Type from the drop down menu.
-
Enter the Trigger Code which will be used to start the action.
For this example, I have used
triggeras the code.
Please note: Trigger Codes are case sensitive!
-
Use the drop down and select Navigate to Layout for the Action Type.
-
Using the Layout Code field, select the Code Identifier already entered for the Layout to navigate to (B).
-
Save.
-
The configured action will be added to the Actions tab.
-
Continue to create the Layout using the Layout Designer tools and once happy with the design, set to Publish.
Schedule
Now that both Layouts have been created and Published, click on Schedule to Add Event information for Layout A.

Please note: As Layout B has been packaged with Layout A it does not need to be scheduled!
Triggering Actions
For development and testing purposes, the webhook action can be triggered using 3 different methods:
Method 1: Via CMS
Please note: Ensure that you have XMR configured correctly to use this method.
Docker installs of the Xibo CMS comes with XMR running automatically for you and most of the configuration in place. However, you will need to adjust the XMR public address of the CMS: XMR - public address.
Xibo in the Cloud accounts come with XMR pre-configured so no action is required.
-
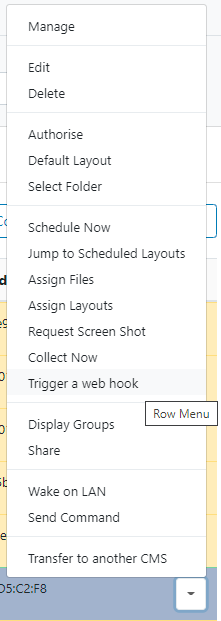
Navigate to the Displays grid from the Displays section of the main menu.
-
Use the Row Menu for a selected Display and click Trigger a web hook.
- Enter the Trigger Code which was set when adding the Action in Layout A.
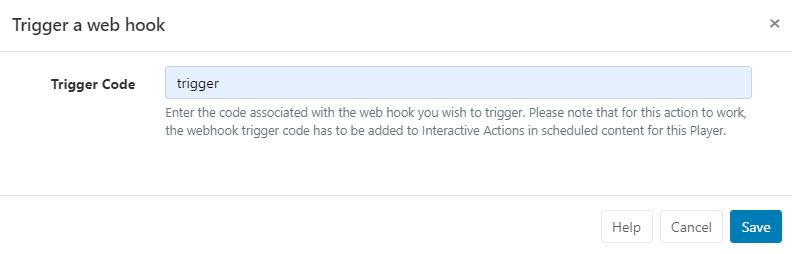
- Once Saved, the configured Action will be sent via XMR to the Player.
Method 2 and 3
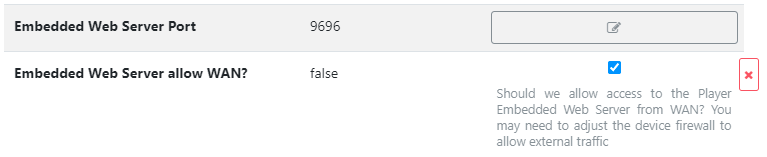
Please note: To use the following two methods, you will need to ensure that the “Embedded Server Allow WAN?” setting is set to True.
Follow the steps below to locate and set this option:
-
Navigate to the Displays grid from the Display section of the main menu.
-
Use the Row Menu for a selected Display and click Edit.
-
Click on the Profile Settings tab and scroll down the form to find the Embedded Server Allow WAN? option
- Save.
Method 2: Via Postman
Please note: For this example, I am using a machine connected to the same local network as the PC running my Player.
- Install and open Postman on a machine that can contact the device running your Xibo player.
The below screenshot shows the trigger action that I have created for this example:
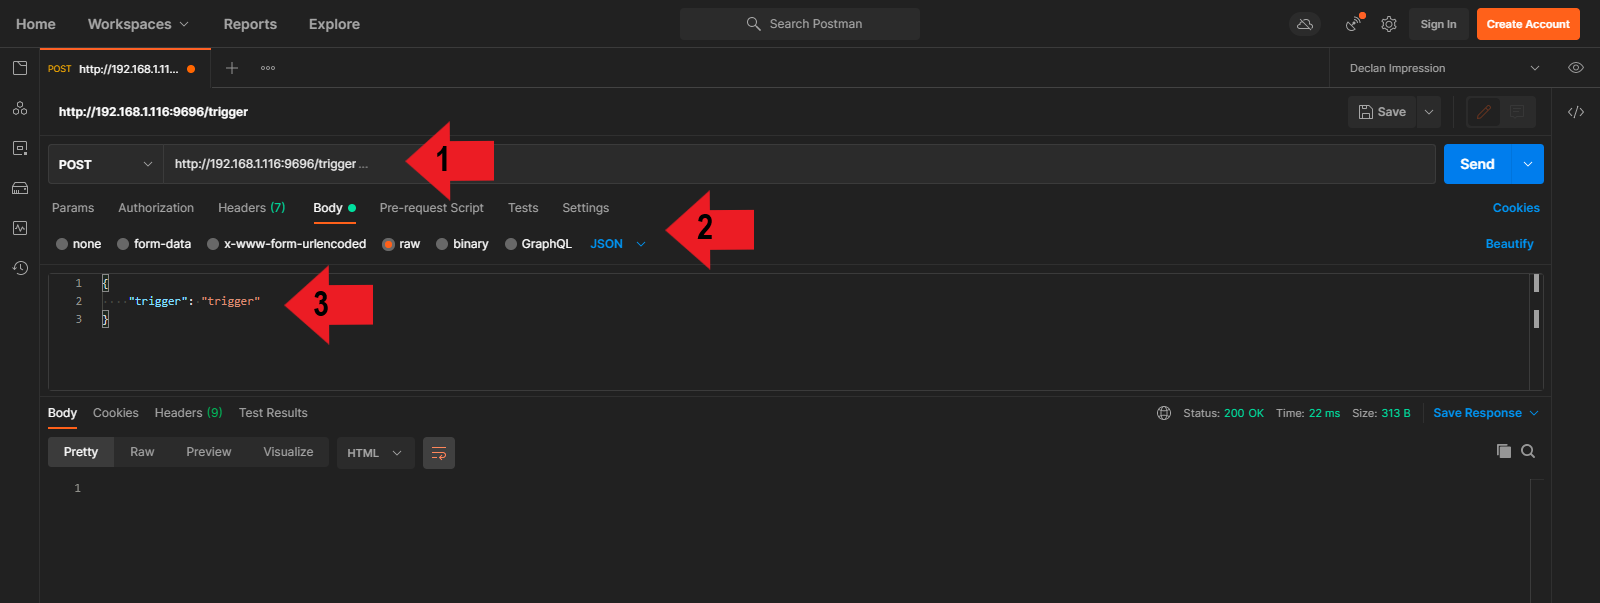
1 - Set the request method to POST and format the trigger URL.
Ensure that you replace the IP with the IP of the machine running your Player.
Amend the default port9696if this was changed in the Embedded Server Allow WAN setting.
2 - Select Body and choose raw and ensure that the format is set to JSON
3 - Finally, enter the trigger code using the {} brackets.
Replace
"trigger": "trigger"used just for this example with your own code in the following format:"trigger": "your_trigger_code_here"
- Once configured, click the Send button.
The trigger will be sent to the Player, which will then perform the configured action.
Note that you can see in the above screenshot in the bottom right corner a
Status: 200 OKto show that the trigger was successfully sent. When troubleshooting an issue with a configured trigger that does not work, please check thisStatus:in the first instance to make sure it has been successfully sent. An incorrectly entered trigger code will not produce any error messages, so please check!
Method 3: Powershell
Please note: For this example, I am using a machine connected to the same local network as the PC running my Player.
- This method will also require knowledge of the IP address for the machine running your Xibo player.
- Open Powershell as an Administrator on a Windows machine that can contact your player device.
Right click the Powershell icon and choose run as an administrator.
- Enter the following command:
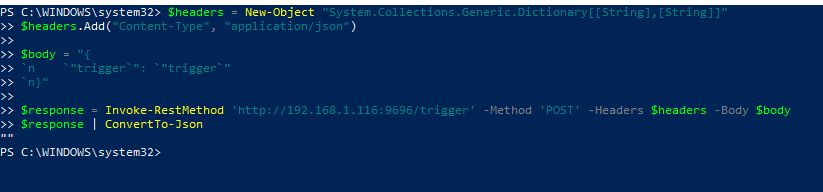
Ensure that you replace the IP with the IP of the machine running your player.
Amend the default port9696if this was changed in the Embedded Server Allow WAN setting.
- Finally, enter the trigger code.
Replace
"trigger": "trigger"used just for this example with your own code in the following format:"trigger": "your_trigger_code_here"
Please note: An unsuccessful attempt will display red error codes! An incorrectly entered trigger code will not produce any error messages, so please check!
Copy and paste the Powershell command below if you prefer, ensuring you replace the necessary details!
$headers = New-Object "System.Collections.Generic.Dictionary[[String],[String]]"
$headers.Add("Content-Type", "application/json")

$body = "{
`n    `"trigger`": `"YOUR_TRIGGER`"
`n}"

$response = Invoke-RestMethod 'http://YOUR_IP:9696/trigger' -Method 'POST' -Headers $headers -Body $body
$response | ConvertTo-Json