After a lot of searching and reading, I was able to figure it out and wanted to post my solution for those that might be looking as well. Maybe this can be added to the official documentation?
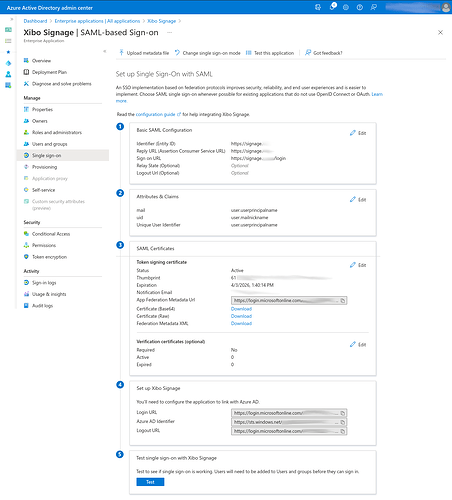
In Azure AD, navigate to Enterprise Applications and click on New Application. This will open a new page where you’ll then click on Create Your Own Application
Enter a name for the app, select the Integrate any other application you don’t find in the gallery (non-gallery) option, and then click Create.
Once the application has been created, click on Single Sign-On in the menu on the left and then click on the SAML card.
Click the Edit button under Basic SAML Configuration and enter the following:
Once completed, click Save at the top of the page.
Click the Edit button under Attributes & Claims and remove all of the Additional Claims. Add 2 new claims, but clicking the Add New Claim button.
Claim 1:
- Name: mail
- Source Attribute: user.userprincipalname
Claim 2:
- Name: uid
- Source Attribute: user.mailnickname
Once completed, keep the page open as information from the page will be needed in the Xibo configuration file.
For Xibo, we’re running it in Docker on top of Ubuntu 22.04. File names/locations may differ.
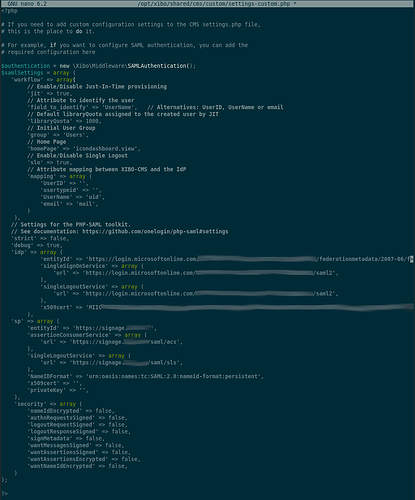
Edit settings-custom.php location in /[docker-mount]/shared/cms/
We’ll need to make the following changes with some information being copied/pasted from Azure.
Under the ‘idp’ array, change the following:
- ‘entityId’ => ‘copy/paste the App Fedoration Metadata URL’,
- ‘singleSignOnServer’ => ‘copy/paste the Login URL’,
- singleLogoutService’ => ‘copy/page the Logout URL’,
- x509cert => ‘Download and open the Base64 Cert and copy/paste the certificate info’,
Under the ‘sp’ array, change the following:
Save the changes and restart your docker containers.

