Summary
Xibo can be used to display Synchronised Events by utilising Displays in a Sync Group.
There are two types of Synchronised Event:
Mirror Sync
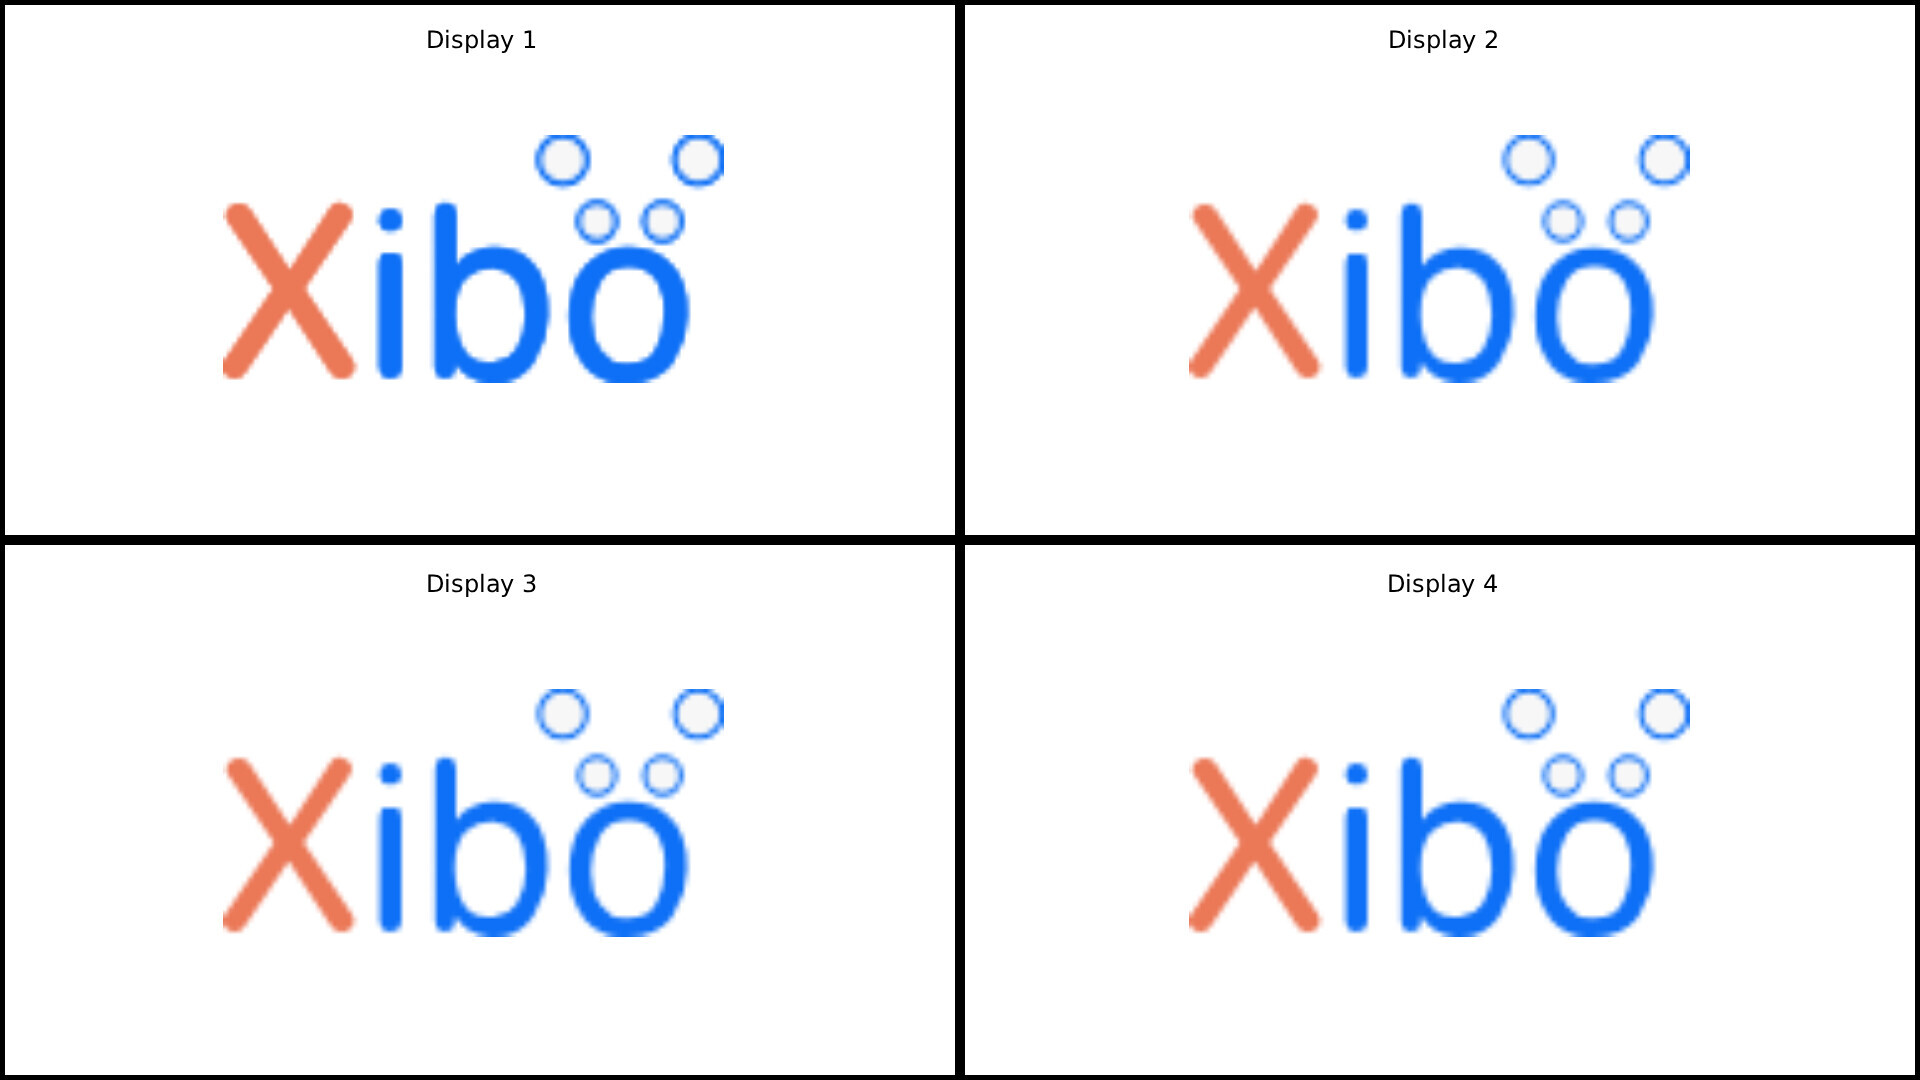
Content is duplicated across all of the displays in the Sync Group with each display showing the same thing at the same time:
Wall Sync
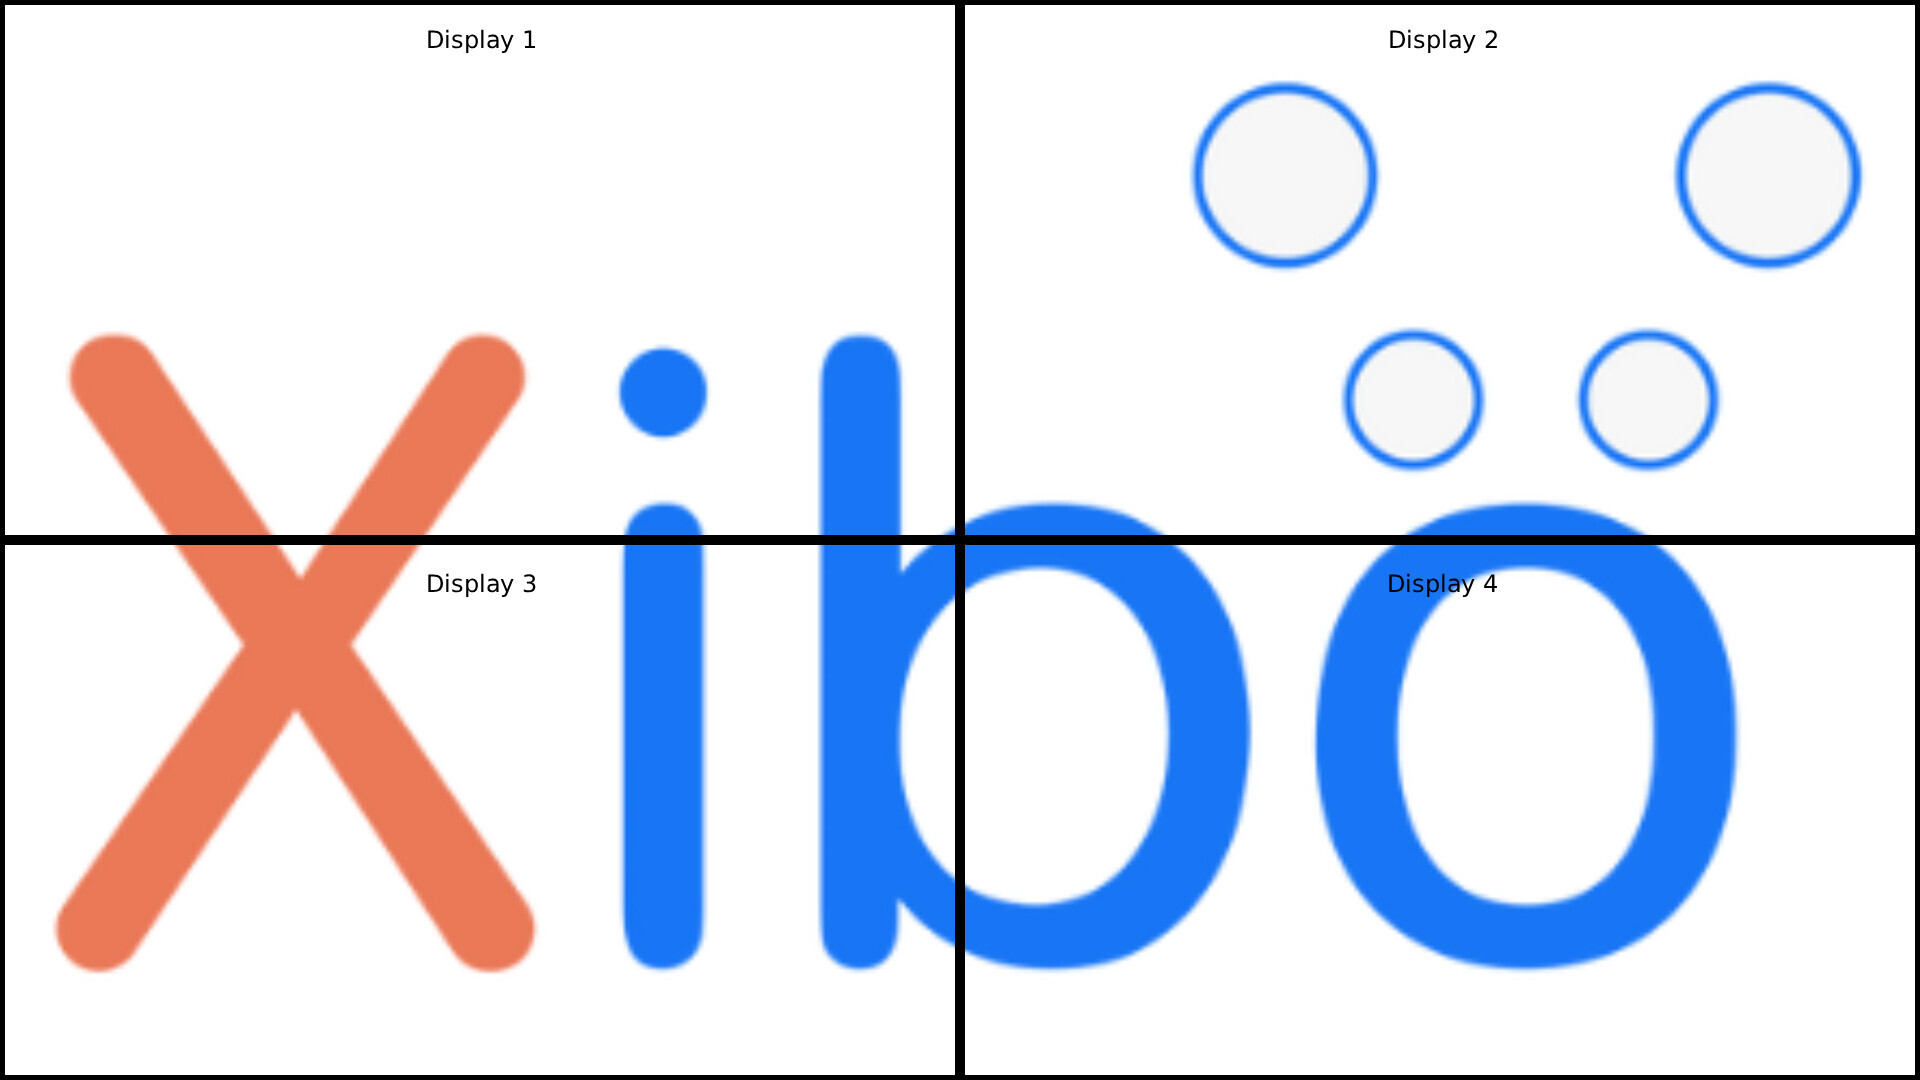
Two or more displays are physically arranged to form one larger screen, with each display in the group showing an equal portion of the entire content:
Version Requirements
The CMS must be at least version 4.0.0
Xibo for Android (v4 R400 and above) is the only player that currently supports this feature.
Sync Groups - Set up procedure and Recommendations
Within each Sync Group, we recommend using high-performance devices of the same player type and hardware specification.
Ideally the devices will support Gapless Playback, meaning they should have Multiple Hardware Decoders if they are Android players.
Each display will need to be connected to the same LAN, preferably via network cables to the same network switch.
-
Navigate to the ‘Sync Groups’ page of the CMS, under the ‘Displays’ section of the CMS menu
-
Click the ‘Add Sync Group’ button
-
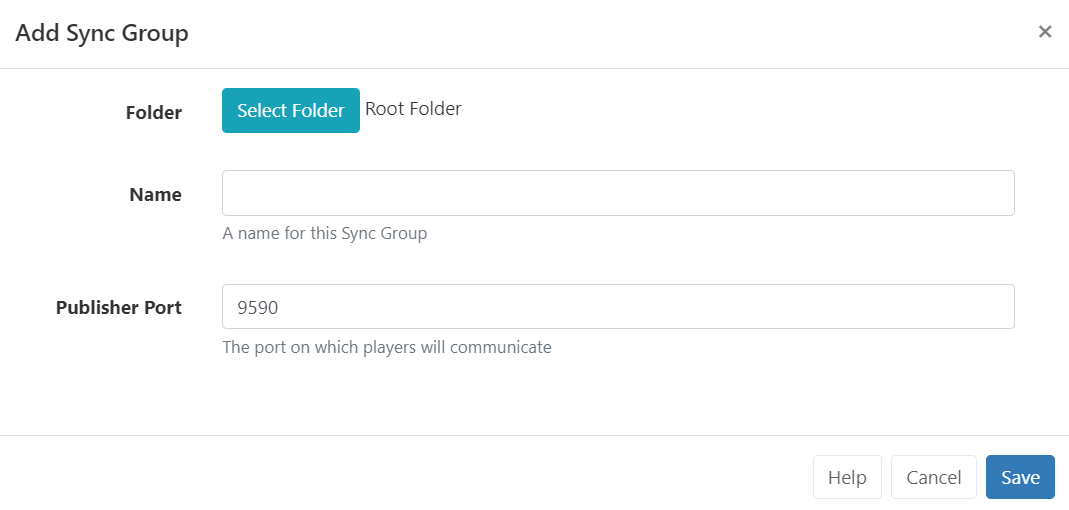
On the Form that opens, optionally choose a folder for the group, and set a Name.
All Displays in a Sync Group need to communicate using their LAN IP address over TCP on the publisher port specified. This is defaulted to 9590 but can be changed if that port is reserved.
Depending on the CMS version, there may also be options for Switch Delay and Video Pause Delay. These options should be left at the default values for now, but we can adjust them later if necessary.
-
Once done, click on Save and you will be presented with a list of your Displays. Select the Displays that you wish to add to the group by ticking the box next to each one and then click on Save.
-
A Lead Display option will now be shown on the ‘Edit Sync Group’ form. The lead display will be responsible for dictating when sync content is displayed and the timings of content changes to the rest of the displays in the group. Pick the Display that you wish to be the lead and click on Save.
Scheduling a Mirror Sync Event
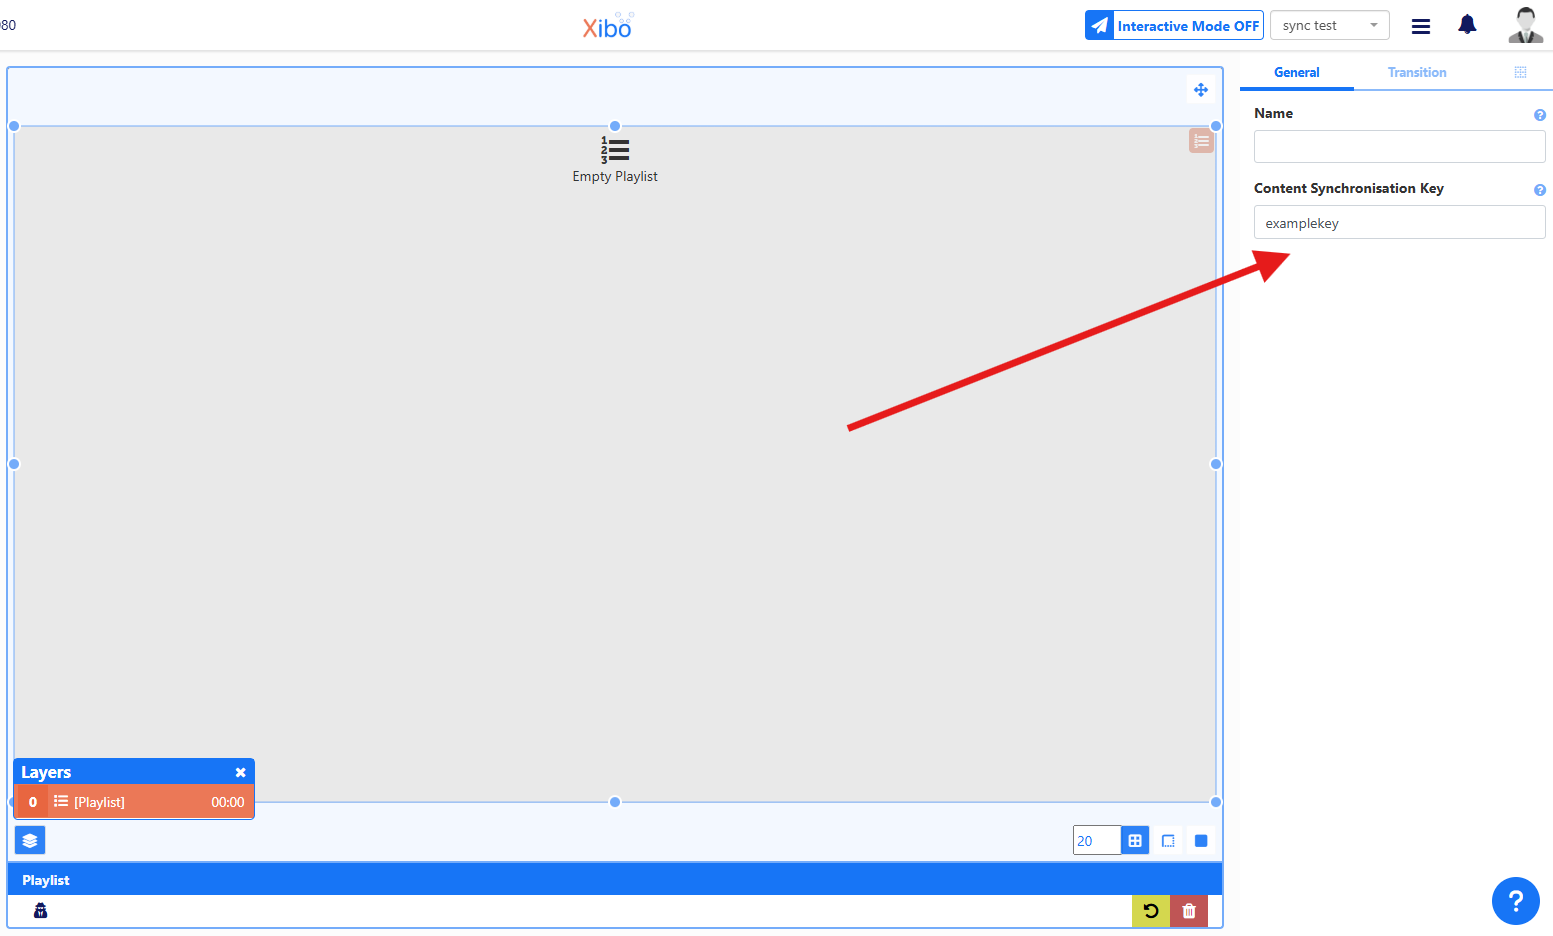
It is recommended to use full screen content, such as a Layout containing full screen images or videos or a playlist of those items. When using a Playlist, a Content Synchronisation Key should be entered on the playlist:
-
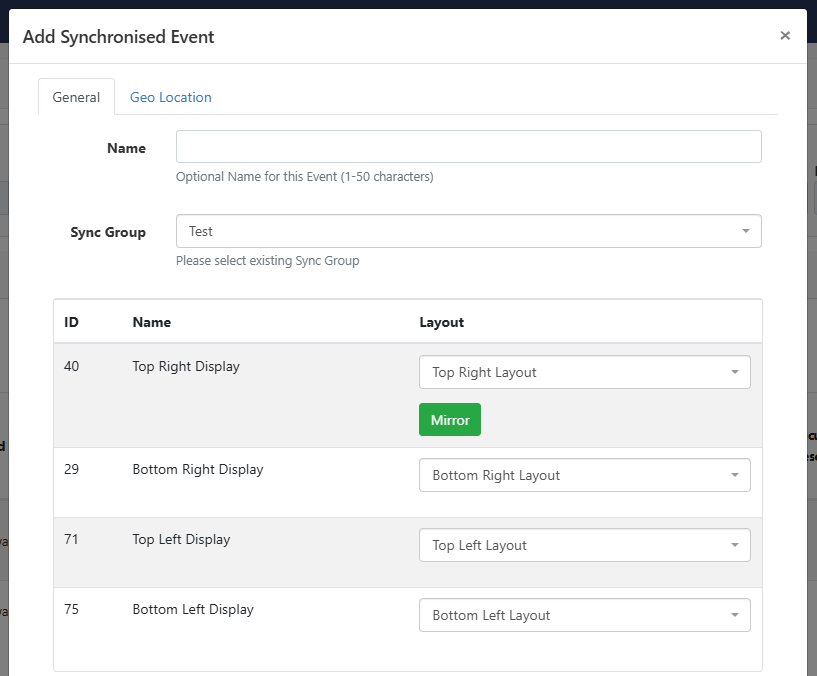
Navigate to the Schedule page of the CMS and click on Add Synchronised Event
-
Select the ‘Sync Group’ that you wish to show the event on, then select the Layout in the drop-down box that appears next to one of the displays. Click on the Mirror button to automatically select the same layout for the other displays:
-
Configure the other options as required and click on Save.

Creating Layouts for a Wall Sync Event
For Wall Sync Events, separate layouts need to be manually created for each display with content needing to be split into sections before being uploaded to the CMS.
- Using Images
To use my example from the top of this post, you would need to use an Image editor to split the image that you wish to display into 4 separate images of equal size and then create a separate layout for each of them:
Top Left Layout:

Top Right Layout:
Bottom Left Layout:
Bottom Right Layout:
- Using Videos
We recommend using ffmpeg to split videos into their required sections before they are uploaded to the CMS.
If the Xibo logo example at the top of the post were a video 3840x2160 pixels in size, and the 4 displays were all 1080p, the following commands would split the video into 4 1080p videos with the following file names:
TopLeftVideo.mp4
TopRightVideo.mp4
BottomLeftVideo.mp4
BottomRightVideo.mp4
ffmpeg -i input.mp4 -filter:v "crop=1920:1080:0:0" -c:a copy TopLeftVideo.mp4
ffmpeg -i input.mp4 -filter:v "crop=1920:1080:1920:0" -c:a copy TopRightVideo.mp4
ffmpeg -i input.mp4 -filter:v "crop=1920:1080:0:1080" -c:a copy BottomLeftVideo.mp4
ffmpeg -i input.mp4 -filter:v "crop=1920:1080:1920:1080" -c:a copy BottomRightVideo.mp4
The crop parameters are width:height:offsetx:offsety
If the video doesn’t have audio or you don’t want audio, you can remove the -c: copy to ignore audio.
Once the video has been split, you would then upload the 4 videos to the CMS and create 4 separate layouts, with each layout containing 1 of the 4 videos, and with each video set to be full screen. For example, “Top Left Layout” containing TopLeftVideo.mp4, “Top Right Layout” containing TopRightVideo.mp4, and so on.
- Scheduling a Wall Sync Event
Again if the layouts contain multiple images / videos in a playlist, a Content Synchronisation Key should be entered on the playlist in each Layout:
-
Navigate to the Schedule page of the CMS and click on Add Synchronised Event
-
Select the ‘Sync Group’ that you wish to show the event on, then select the corresponding Layouts for each display, for example:
- Configure the other options as required and click on Save.
Troubleshooting
If your Synchronised Events are not running in sync (i.e. one or more of the displays is not displaying the content at the same time as the others), the following things should be checked.
-
Is the same Content Synchronisation Key being used in any Playlists that are present in your Sync Event Layouts?
-
Are you using high performance devices that support Gapless Playback?
-
Are all of the devices the same model?
-
Are all of the players of the same player type? (i.e. all Android or all webOS, etc.)
-
Are compatible player / CMS versions being used?
-
Are the devices using a wired network connection?
-
Are all of the displays able to communicate over TCP via the Publisher Port that has been specified in the Sync Group?
If the answer to any of these questions is no, then this should be looked into further as this could potentially be the cause of / contributing to the problem.
You should also check that the ‘Switch Delay’ and ‘Video Pause Delay’ are set to sensible values in the Sync Group.
These are the Default Values:
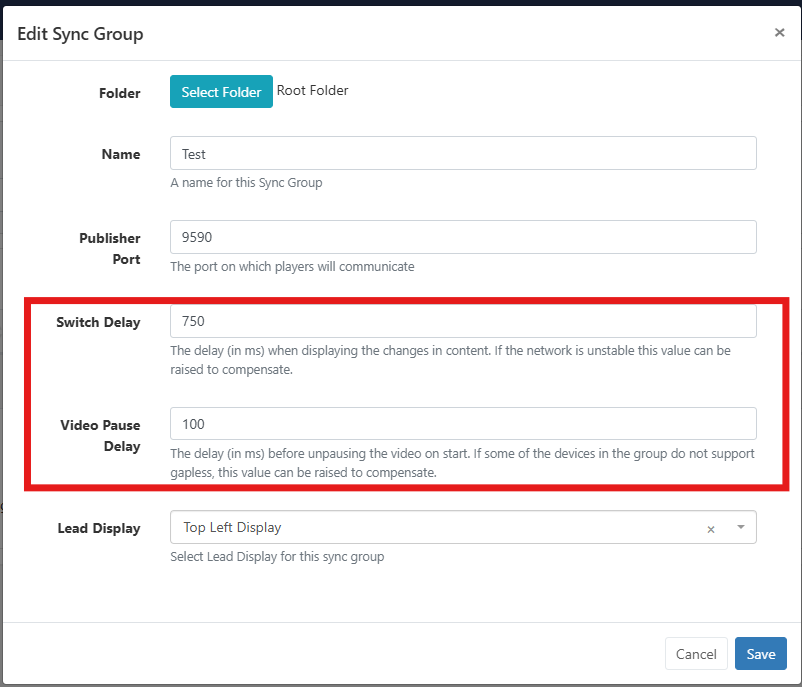
The Switch Delay and Video Pause Delay are set to a sensible default designed to give the media players time to load the new video, get it ready for playback and then play it together at the same time.
The shorter these settings are (lower ms) the less likely the content will be to sync, but the smaller the black gap/pause will be between content.
A Switch Delay of 750ms should be more than enough on a wired network. For Wi-Fi networks, or unstable networks, it could be increased.
A Video Pause Delay of 100ms should be plenty for most media players with good hardware specifications. If an older or less powerful device is in the mix, this can be increased to give more time for the device to complete its video decoding before starting. This is also useful if the device does not support multiple-decoders as the video can’t be loaded in advance.
If you have the Video Pause Delay set to the default, raising this value in increments of 25ms at a time may be necessary to give the device more time to sync.
I have seen cases where reducing this value can resolve issues where the Lead Display is running behind the other displays. For this scenario, if you have already tried increasing the Video Pause Delay without success, I would try reducing the value below 100ms in increments of 25ms to see if there is an improvement (but do not reduce the value to zero).
Additional tips
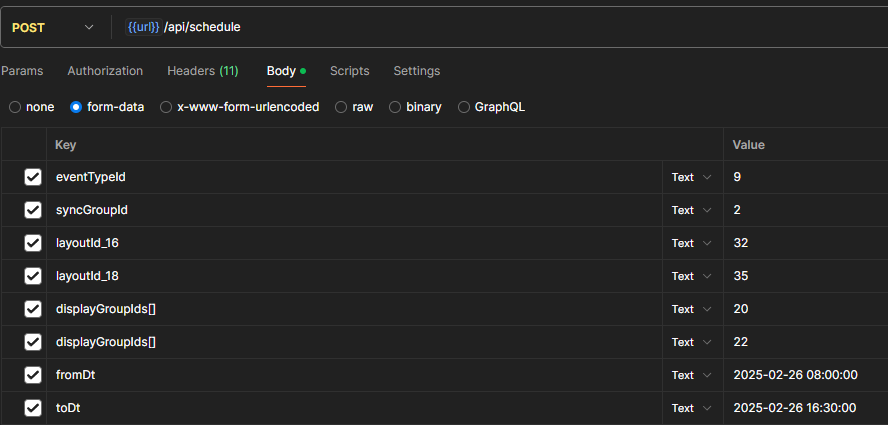
It’s possible to schedule Synchronised Events using the API.
To do this the eventTypeId needs to be 9
The syncGroupId needs to be included
Then layouts need to be provided for each display like so :
layoutId_{displayId} with value {layoutId}
Everything else is then the same as it would be for a ‘normal’ scheduled event
Example from Postman: